Apache 2.2.16Installation Guide |
| Purpose |
| Outcomes |
| Which Apache Version |
| Notes on SSL |
| Download the Software |
| Prepare for Install |
| Begin the Installation |
| The License Agreement |
| Apache User Community |
| Server Information |
| Setup Type |
| Custom Setup |
| Destination Folder |
| Installing and Testing |
| Home Directory/Folder |
| Change Document Root |
| Prerequisites |
|
|
|
|
|
|
Is your add-on system utilities package current and up to date? Choose the one most suited to you BIG discounts for Multi-user
Issues? This may be the best in registry cleaning business!
|
Installing Apache 2.2 on Microsoft Windows |
|||||
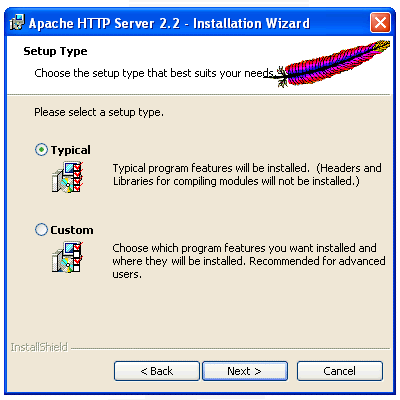
Setup Type:Next we are asked to specify the type of installation we want (Fig. 05). Typical is fine for our purposes, so we select typical and then select next. (Note: If you would really like to see what is installed with this Apache software, you can select "custom", then "next" to see what components will be installed. Then select the "back" button to return to this window. This time choose "Typical" and then "next" to continue with the install as normal.)
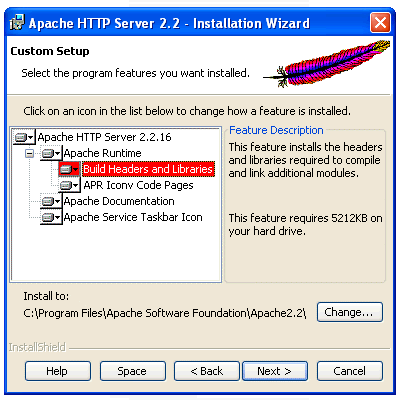
Custom Setup :Most users can safely skip the custom setup step (Fig. 06) and simply use the default install option. A custom installation is not required to install and setup either MySql nor PHP. Custom Setup offers the ability to compile and link further Apache Modules. If you know you need to, or wish to add this feature (see Fig. 06, highlighted in RED below with it's description on the right), select the menu item with the red X and choose This feature will be installed on the local hard drive from the drop down menu that is presented to you. If you have selected a custom install, you would also confirm your installation directory at this point. The default destination is recommended. "Space" allows you to check how much hard disk space is free on your drives while "Help" will display a key for icons used on this window. (Note: You can easily add/remove any feature at any time by simply restarting this 2.2.16 installation file after the program has installed.)
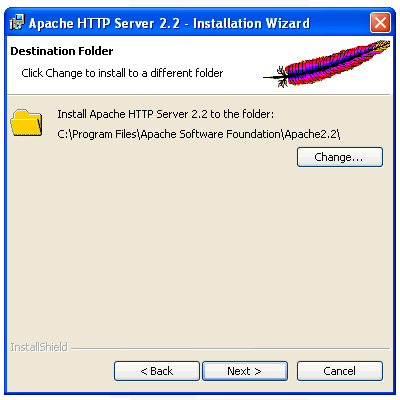
Destination Folder :If you selected the Typical Install option, your next window will be the Destination Folder (Fig. 07). Like most programs, using the default destination folder makes life easier for those new to any software and Apache is no different. This step allows you to change exactly where apache is installed on your drive(s). However, most of us will simply select next.
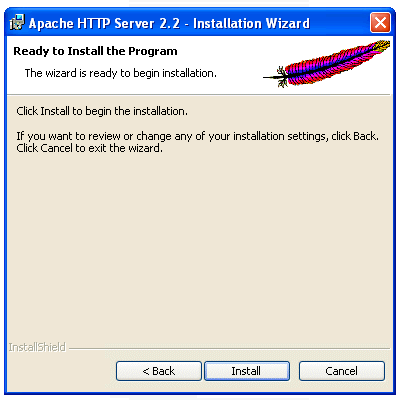
Installing and testing:You are now ready to install your apache HTTP server. Select "install" (see fig. 08).
The Apache installer now installs the required files into your system with the parameters we have selected. Upon completion, you should note a new icon in the system tray which will tell you if your server is in a running or stopped state.
If your Apache HTTP server 2.2.16 is running properly, you will see the icon with the green triangle inside. If not, use the start menu and find the configure apache server menu (or jump to Help - I can't find my apache system tray icon). Here you will find the test configuration link. Select this and you will either see a test window that will shut almost as quickly as it opened (this means all is fine) else you will be shown an error which will need to be corrected. After testing your server, and if you have completed a default installation, you can also check for any server error.log errors by browsing to: C:\Program Files\Apache Software Foundation\Apache2.2\logs\error.log. The administrator can easily manually start, stop or restart the server using this system tray icon (Fig. 09). Place the mouse cursor over the apache icon, depress the left mouse button, slide up to apache 2.2, and then select the server state required from the list. Right clicking the icon offers a more advanced range of options. To test your server, ensure the server is started and then simply initialize your internet browser and type either: http://127.0.0.1 or http://localhost into your browser location bar and press the "enter" key on your keyboard. (You can also copy and paste the above links into your browser). If everything is fine, you will be greeted with "It Works!" or if you have altered your home page directory as per the notes below, you will be greeted with "Index of/" and if this directory is one that already has a bunch of stuff inside it, you will see all your files listed there. Else, throw together a quick index.html, php test page or even a couple of .gif images or a .txt file into that directory so you have something to see. If you have a problem with the localhost command, you can check your hosts file (there is no "." extension on this file) by browsing to C:\WINDOWS\system32\drivers\etc and opening the hosts file with notepad. If this next line is missing, add it then save the file. Re-start apache and try testing the above links again. 127.0.0.1 localhost Let's now learn how to change the home page folder. You can point this apache home directory to any one of your test websites on your computer workstation. You can also repeat this next step at any time to point to another test website when switching between different website administration jobs.
Home directory/folder:Your home directory (folder) and in a standard installation this is located at: C:/Program Files/Apache Software Foundation/Apache2.2/htdocs/ This is also called our document root and is where you would place your index.html file and all other media you plan to test or serve from this server. You would add any needed sub-directories from this root. Eg. an images or thumbs sub-directory. You can also change this document root directory. This is especially handy if you administrate more than one website. If each website you administer has it's own directory, you can set that directory as the document root very easily. By doing this before you begin modifying each of your clients websites, you can fully test the interaction of an entire website before you take that website live with your changes. Let's learn how to do this.
How to Change the Document Root:If you would like to change your document root (root directory), you can do so by editing two lines in the the Apache httpd.conf file. The httpd.conf is the Master Configuration File for your apache server and can be found by exploring the location C:\Program Files\Apache Software Foundation\Apache2.2\conf\ on your computer. We can also gain access to this configuration file from the windows start menu through the Apache HTTP Server 2.2 program group by selecting Configure Apache Server and then selecting the shortcut titled Edit the Apache httpd.conf Configuration File. The first line we wish to edit is: DocumentRoot "C:/Program Files/Apache Software Foundation/Apache2.2/htdocs" (Note: make sure you read the line correctly and that you only change the line that says DocumentRoot and not the line which states ServerRoot.). When you have located the DocumentRoot line, the administrator can then modify this to suit his preferred location eg. DocumentRoot "C:/public_html" The second line we edit is only a few lines below our first edit and modifies apache's directory tag which we alter to: <Directory "C:/public_html"> (Note that both edits have identical paths as they both point to the exact same location). It is better to personalize this folder to suit your needs like for example; "C:/www_campisi_pizza_website" or what ever makes it easier for you to locate each client among the list of client sites that you manage. Make sure you have created the folder/directory called public_html (or www_campisi_pizza_website) and place the applicable website files into that directory for this to work correctly. If you plan to add password entry to your site, it is better to make the document root a couple of sub-directories in. eg. "C:/websites/campisi_pizza/public_html" The reason for this is that you will probably want to keep your password files off the web and away from search robots. This enables you to do this. Make sure you reflect any change in the Directory and DocumentRoot locations in the Apache httpd.conf file as you have now learned to do. This is the popular method for PHP 5.3 users who would also select the Apache-CGI option during the Php install process. Always restart Apache after configuration changesAfter you have completed these edits, you would also need to restart the apache service for the changes to take effect. So we click our apache icon in the system tray (or use the newly installed Apache HTTP Server 2.2 program group menu and named control apache server which you can access from the Windows start button - All Programs menu) and select restart to reinitialize the service with the new configuration. That's it! Before you start acting like this, follow the link! I can't find my apache system tray iconHere's a little tip if you cant find your apache status icon in the windows system tray. (near the clock). Most common reason is that Windows thinks it should not display it (or apache isnt working). In windows-speak, this is called a notifcation. So let's go customize some notifications:
Module CompletionIf you are confident with what you have learned here, then you have also gained a couple of very basic entry level skills into handling your apache server. Pat your self on the back, you have completed this module course.
Module Length:
Pre-requisites:The website administrator has previously attained the following computer skills:
Applicable OS Platforms :
Other Software-requisites: (for NT 4.0 or 2000 only)
Hardware-requisites: (All)
|
|||||
|
Copyright © 2010 Header Photo Credit: Glenn Grant, National Science Foundation |
|
|||||||||||||||||


