Apache 2.2.16Installation Guide |
| Purpose |
| Outcomes |
| Which Apache Version |
| Notes on SSL |
| Download the Software |
| Prepare for Install |
| Begin the Installation |
| The License Agreement |
| Apache User Community |
| Server Information |
| Setup Type |
| Custom Setup |
| Destination Folder |
| Installing and Testing |
| Home Directory/Folder |
| Change Document Root |
| Prerequisites |
|
|
|
|
|
 |
Installing Apache 2.2 on Microsoft Windows |
||||
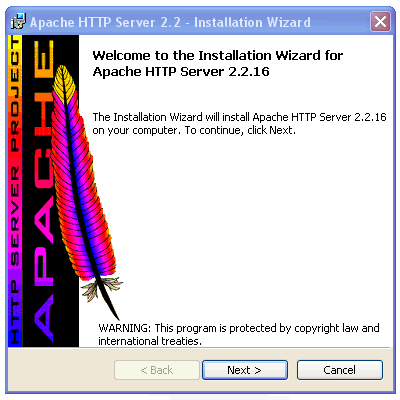
Begin the installation:Start your downloaded file: httpd-2.2.16-win32-x86-no_ssl.msi (double click or right click/run) and this training module will help step you through the data input selections the wizard will ask of you. The wizard starts with the following start-up screen (Fig. 01):
The Administrator will be wise to note that this same installer file can also be started to modify/repair/remove an existing installation. As this is our first installation, the only option we will be presented with is to install the server software. Select next to move to the next part of our Apache HTTP server 2.2 installation.
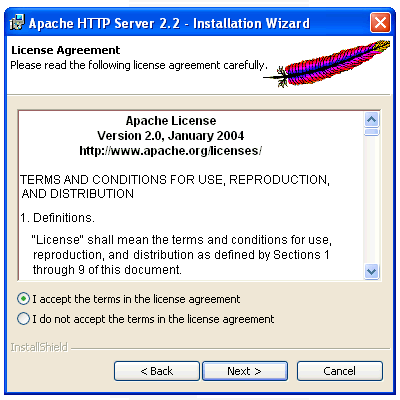
Accepting the License Agreement:The second window loads the License agreement into the viewing panel (Fig. 02). The provided scroll bar enables you to view the entire contents of the agreement. Check over the details to be sure you are happy and willing to comply and accept the conditions as laid out for your use of the software. If all is acceptable, select the radio button in front of the phase I accept the terms in the license agreement and then choose next to continue the installation process.
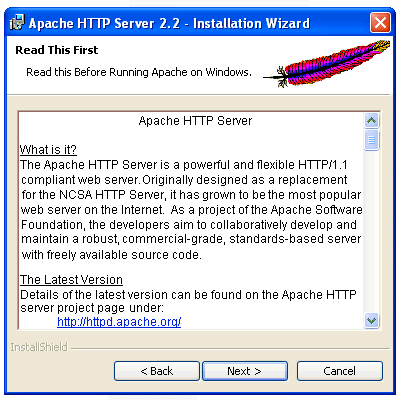
The Apache user community:Our next window (Fig. 03) is quite brief and will give us some useful information like where to subscribe should there be desire to keep abreast of new code releases, bug fixes, security fixes and other general news or information for your Apache server. Visit, bookmark or subscribe to anything of interest and then choose next to move to the next stage of the installation process.
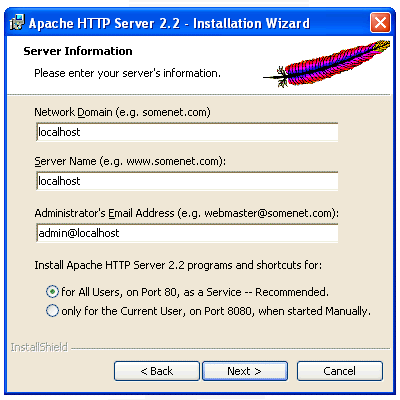
Entering your Server Information:Our next window (Fig. 04) is of extreme interest to the Website Administrator as it defines our exact network location in terms of our DNS domain. If we were establishing a www set-up, this step would be of elevated importance and would look something like this: server.mydomain.com. This full name would be our Server Name (The second line in our form in Fig. 04). mydomain would of course be replaced with the duly registered domain name of your website (or that of your dns server). Our network name is the last part of this address: i.e. mydomain.com (This becomes the first line in our form in Fig. 04).
Some people also like to monopolize their website name in as many different domains as possible because Google's SEO formula can be dependant on the website's geographical DNS location e.g. .com.au, .uk, .it etc. This also stops other people cashing in on your idea or brand name. You can search and register Domain names or get DynDNS here. (Europe, Asia, Oceania, America etc. etc.) And as the purpose of this tutorial is to place a server setup on a local network to further familiarize the website administrator with Apache, we will gloss over this point for now and define our DNS domain as a local domain only.
We enter "localhost" as our Network Domain, and we also enter "localhost" as our Server Name. You can name any email address you like as the administrator's email. If we wanted to secure a domain first, or use DynDns, we used the link above and can either use the data now, or we can add them after we have setup apache. Next we want to ensure our network users can find our server and we setup their shortcuts by choosing the radio button marked for All Users, on Port 80, as a service -- Recommended and select next to continue with the installation process. Note: If you select Port 8080, you will need to stipulate this port when calling your network. eg. http://127.0.0.1:8080/ or http://localhost:8080/index.html Some Vista Operating System users may opt to use port 8080 if they are unable to resolve any port 80 conflicts as mentioned in page 1 of this guide.
|
||||
Copyright © 2010 Website Administration Services ™ |
|
|||||||||||||||||


