Website Admin Services
WebsiteAdministrator.com.au
Free Online SEO Training Course
How to Create Projects in StatCounter
A project can be used monitor a product or the entire web site
 |
Creating Projects in StatCounter
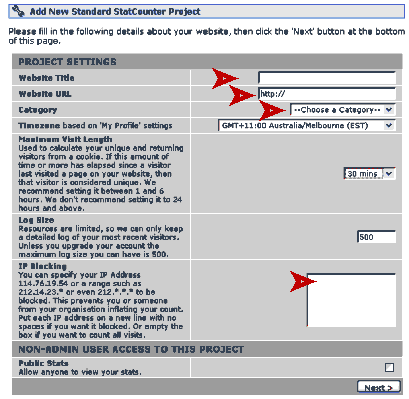
After you have registered on the site, you can then begin creating projects to use with your stat stat counter / tracker. For this we use the Project Settings Window. See image on the right which shows you the project setup fields.
We setup one project at a time. You add a second or more project from the projects tab. Find and select "add another project" and repeat the steps for each additional tracker-counter you require.
Each single statcounter you create is called a project. You may only want a single counter for a single website (like we do), but you can use more. The Website Title you choose here becomes the name of the project. If you wish to only track part of a site or a product, you can create a more suitable name.
For example, you might wish to keep statistics on two or more of your products or services separated.
(1) Product #1 (margarita, pepperoni etc.)
(2) Product #2 (tortellini, ravioli etc.)
Then create a project for each with a unique name eg.
(1) PizzaProducts
(2) PastaProducts
tracking codes
Each project generates a different tracking code to insert into your html pages. All you need to do is ensure you place the correct tracking html code on your correct website pages and StatCounter will do the rest.
If you only want one statcounter per website, you should name the project after your website name. This makes identifying any future additional projects a very simple affair.
Then when you login to the StatCounter site, you will be greeted with the list of projects (trackers-counters) you have installed. Simply click on the project name you wish to view the stats for.
The red arrows in the next image (right) show you the fields you should address to properly create a project in StatCounter.

Remove your personal hits by using the IP blocking field in this step. Your current ip address is: 18.222.26.253
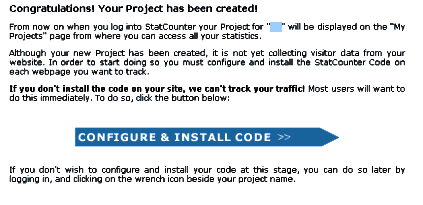
You can make your statistics public if you like. The default setting is hidden. After you complete the details on this page and click next, you will greeted with a window telling you your setup is successful.

The final touches to the setup of your statcounter page counter and stat tracker
Finally, to create your special HTML code which will do all the statistical work for you, select configure and install code >>.
This gives you the copy/paste html code you need to insert into your web pages. The code must go between the <body></body> tags in your HTML page. When you have had some hits to your web site, you are then ready to enter the statistics area by selecting any of your projects in the Project Name list (see image below). Selecting the spanner icon allows you to view and change some of the configuration settings. Setup of an email report to be sent out to you weekly or monthly by selecting the envelope.
Selecting your Project Name to enter the statistical area of your StatCounter

Introduction | Alexa | StatCounter | GZIP | Clean HTML | Valid HTML | Valid CSS| META tags | Images | SiteMaps | Google Tools
